All you need to know about the Tiwal 3
February 11, 2019
Our News
We keep saying the Tiwal 3 sailing dinghy assembles in 20 minutes. But did you ever get to see its whole assembly process?
https://www.youtube.com/watch?v=mhS2w2TjO0w
Hi, I’m Vincent. I’m part of the Tiwal team.
What is Tiwal? It’s the boat next to me, it’s this dinghy. The great thing about this boat, is that it can be carried in two bags. The hull is inflatable: so you can put it in the trunk of your car, you don’t need a trailer, no need for a parking space, no need for a boat ramp for launching. You can just park by the beach, open the trunk, take out the bags… and assemble…, which is going to take about 20 minutes and then we’re on the water, to enjoy a nice family or single-handed trip. We’re going back to my car to get a Tiwal, to show you step by step, how to get it ready, carry it, assemble it… before putting it in the water.
So there, you see… The boat is complete and stowed in the trunk. On this type of car with a two-thirds / one-third split rear seat, if you fold down 1/3, you can keep two seats in the back, and most importantly, you still have plenty of space to store your bags.
So, if you are a family who travels with lots of luggage, you’re going to have to make some concessions or find other solutions, but there are always possibilities to take the boat with you. You could use a luggage rack here, and put the boat on the back, like you would with a bike carrier or up top, on the roof rack, or in a cargo box of about 21 cu.ft to accommodate the 2 bags.
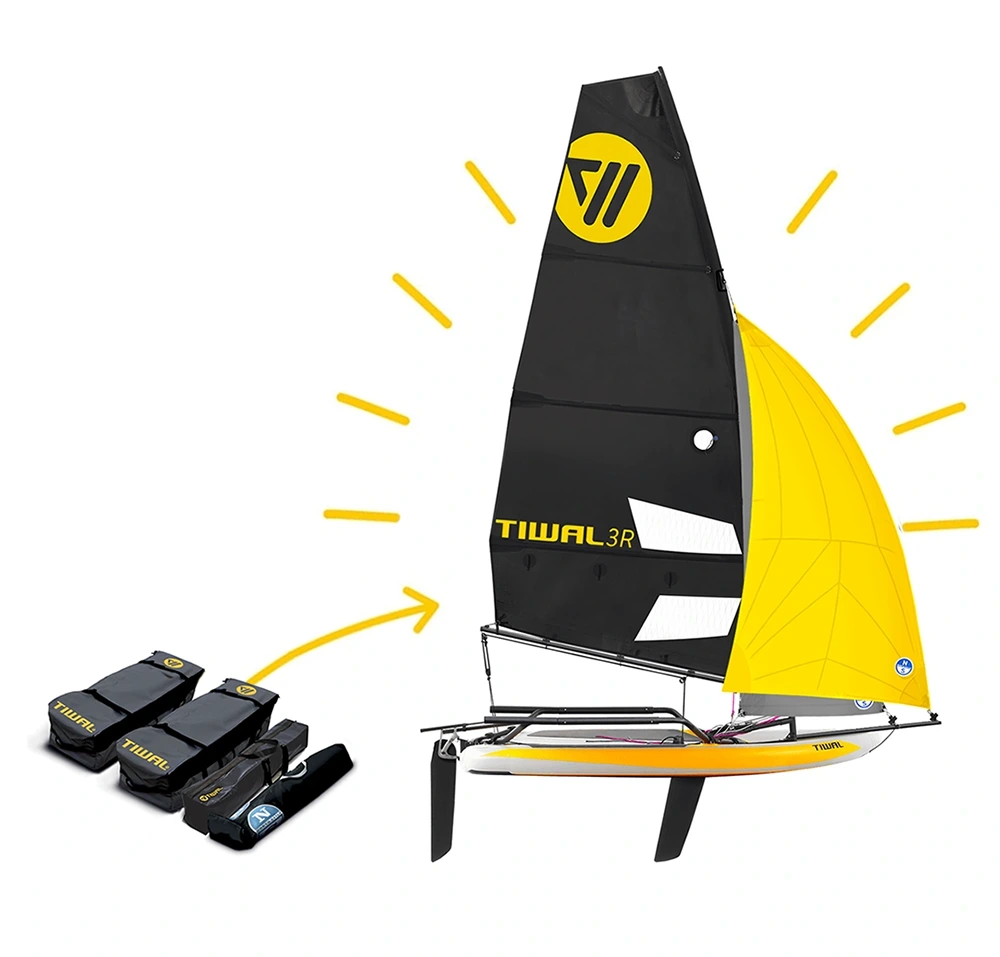
Two bags, easy to transport
The 2 bags measure 5 feet by 16“ by 14“ They’re not little bags, but that’s normal because Tiwal is not a toy either! Not a small boat, but a 10’6“ boat that can take two adults on board. These 2 bags weigh about 62lbs each. In this bag, we have the structure, i.e. all aluminum parts that form the structure of the boat, there’s the rudder, the daggerboard, the sail, and even the mast which is made up of 5 sections. It is a carbon mast and is like you’d have on a sailboard It’s all here! In the other bag we have the hull. That’s really the big advantage of the boat: its inflatable hull. Here the 10’6“ hull fits in this bag and remains very easy to handle. Now I close the trunk, and we’re going to take the bags to the beach. Obviously we’re not going to walk miles with them, but over short distances, you can easily carry the bags on your own. The important thing is, to carry the bag close to your body. The advantage is that on a narrow path like this, you can’t come with a traditional boat, while with Tiwal: no problem.
Hull and structure Assembly
You’ll see, it’s really simple, putting it together will take about 20 minutes, without any tools, and it’s intuitive. You need to learn how to do it, using our detailed manual and with experience, you’ll get quicker. Every year, we organize the Tiwal Cup, and before each start of the race, we organize an assembling challenge: the record to beat is about 10 minutes! But what matters is that even if it takes 30 minutes to get there, it remains quick and easy. We’ll start by unpacking the hull. The bags, they open like that, we can see that they are plenty big enough and the openings too, to make them easy to repack, you don’t have to do it 10 times to get the hull back in the bag. There really is room.
Put the hull into shape
So now I’m taking out the hull. I’m going to put it in front of me. I’m loosening the securing straps that are here, and now I can unroll the hull. That’s it, the hull is unrolled. You can see the velcro already in place, and the toe-strap as well. That saves time. Now we’re going to inflate the hull. There is a low pressure pump in the bag that will give the volume, and shape the hull, before putting the structural sections in place.
This electric pump is battery-powered, you can charge it up the day before and you are self-sufficient on the beach for inflating the boat. We have 2 valves on the boat that correspond to the 2 separate compartments. These are standard quarter-turn valves. To open, you will have to press and turn 1/4 of a turn. So that’s it, my valve is open, just now, and when we remove the pump, we’re going have to close the valve.
Now, here we go, I’m going to inflate it. That’s it, we’ve inflated the hull to nearly 80%. We close the valve, That took a little over three minutes. Now, our hull is a little over 8» deep, so that already gives it rigidity. But then, the structure we’re going to put in place, forms a kind of chassis: and that’s what takes all the load from the rig, the rudder, the daggerboard, to end up with very little deformation in shape. We’ll be sailing on a hull that’s as stiff as on a traditional boat.
Assembling the Structure
Now we can unpack. the bag containing the structure. A bag similar to the hull bag: same size bag…. with a large opening. In it, you’ll find all the remaining parts: the various elements of the structure, the sail, the carbon mast, the rudder and the daggerboard. The first piece we’re going to put in place, will be the daggerboard well. We’re going to take a closer look at this central part. It’s an aluminum part that passes through the hull and then the board sits in the well. Sometimes we get asked whether the hull is ever deformed by the daggerboard, and if there’s any play. The answer is no: thanks to this real aluminum daggerboard well, which takes all the load.
So, we’re here to put it in its housing here, provided for this purpose, we position it… And align it with the buckles, and the stainless steel rings.
Then I’ll get out the rest of the sections of the structure. Here we have the two seats. Then we have both reinforcement arms, and here the wings. I’m putting them directly on the hull. I use the hull as a mat, to avoid getting too much sand on them.
Note: here we have bungs at the ends. Yellow caps… and black caps. Yellow caps are going to be on the left side of the structure, to show you which way round, and the black caps go on the right. As for the tubes, assembly is like this with these pushpins, you press… and it clips in.
We’re going to start assembling, so I’m going to start with the reinforcing arms. Yellow caps on the left, I’ll just put that in here, and with a press of the thumb, you just need to push it‚… and you can hear the little click. So that’s it, it’s all set up fine. We’ll do the same on the other side. with the black caps… Press firmly… Then you will have to identify the forward wings… and the aft wings: there are two for the front, two for the back. On this part, there are 3 push-pins, so it’s a front wing. The wing will go through here, and end up in this housing here. When I orient this bit the right way, I have the push-pins pointing upwards… To avoid falling into the first hole, so I insert my piece like this I press, and get through it with no difficulty, once I get there, I’m going to press and hold the structure by pushing with this hand. and so now with two fingers I press here, I rotate the section… and you see, it sets up by itself. I’ll do the same on the other side. So same thing, I press, I push it through, I press there, and turn it
Now let’s assemble the transom. We have the rudder bracket that’s here. Black caps on the right, same thing… It’s really great, there are no tools, only these interlocking systems. that allows the structure to be assembled. Now there’s just the seats left. I’ll set one up. The first seat… Same system, that’s ok. That’s the last piece to be put in place. So there’s a little trick here. If I do it like this, I’m going to have to slide it onto the frame and bend it, or I do it like this: I put it in, I push the tube forward, which allows me to realign it, once I’m in line… I’m going to be able to slide it back and position it with the push-pins. So that’s it, my structure is assembled, and it’s all one piece. We’ll fix it with the velcro to the hull and that’s the first stage complete.
Positioning the frame on the hull
I’m starting by positioning my frame down the line of the boat, so that visually, the structure is in the middle of the yellow band. And now, with the velcro straps, you’ll see, there are several marks: the long length goes inwards, here we see a red band that we’re going to bring and position on the ring just there. After that you have markers with a single yellow line, another one here, there, you have a double line and on this side too. So here’s how we do it: we’re going to pass it through there, and bring the red line to there, we go over the tube, and we’re going to fold down the yellow line, on the yellow line, and the double line… on the double line. And we close it again. It’s very important to do it like that, over the structure, never underneath it because the structure won’t be secured against the hull. So now, you see, It’s well-secured. The other Velcro straps still need to be done up.
Now that the structure is assembled on the hull we’ll be able to fully inflate it to high pressure. When new, the boat is delivered as standard with this second, manual pump which has is a pressure gauge. And we’re going to top it up to 11 psi.
Inflate the hull to high-pressure
It should be noted that we also offer a high pressure electric pump. This one is optional, and will allow to inflate with more freedom, and by that I mean we’re going to set the pressure, we can go away, and when we get back, the inflation has cut off automatically. It’s quite practical. You have a battery here, which allows you to be self-sufficient on the beach. I suggest you inflate one compartment manually, the other with the electric high-pressure pump, So you can see the difference. So here we go. I connect the hand pump. There’s a 1/4 turn opening You put the nozzle on the valve and turn.
For the high-pressure pump… Take out the battery, and here, I’ve got the nozzle, the same as the other one. I’m here to position that there, I connect the battery, and I connect the hose. The pump is operated by pressing start. Now, manually here, we’re going to use the pump like this, the important thing is to hold it in place with your feet, and keep your back straight, at first it’s fine, but at the end it’s a little harder so make sure you inflate it properly. By bending your legs.
What you also need to know is that now on paddle-boards we get up to 20 psi, whereas with Tiwal, 11 psi is enough, since the rigidity comes from the aluminum structure. So that’s it, it’s pretty cool! OK. Let’s do it! Now we’ve reached 11 psi. We can see that the electric pump is a bit quicker, it stopped before me.
Now I’m going to disconnect the valves. I close the first valve. then the second one. We can see that with the electric pump the big advantage is that while it’s running we can do something else, we can go get ready, you can get changed, put on sunscreen, or prepare the sail. While with the hand pump, now I’m hot!
I’m going to digress at this stage, to look under the Tiwal’s hull. What we can see immediately, which is great, is that you can feel the lightness of the boat, it’s really easy to carry. I’ll show you a first thing here: a drain plug. Why? Water will always be able to infiltrate somewhere, it’s going to get into a boat hull, as on any kayak or any fiberglass boat, there’s a bung. On a Tiwal, it’s here, in case there’s a little water between the two compartments.
Another point is that we can see clearly on the front, the form of the hull. It’s not a board. The hull isn’t flat. The hull is V-shaped so as to have a bow that helps the boat get up on the plane and get through any chop. One last important point I wanted to show you, is the chafe strip. This band, the black part, it’s fabric used in rafting boats, It’s wider at the back. This will allow beaching, to drag the boat over short distances and all hassle-free. It’s really strong. The bottom of the hull is really strong. And even if we let it go like that, in the end, not much is happening. I don’t want to exaggerate that, but that’s it, it’s THE big advantage of an inflatable.
Prepare the rigging
Now we can see about preparing the rigging and set it up to go sailing. We’re going to take the sail out, and unroll it on the beach. What you need to know is that if you want to save time, You don’t have to fold it in half. It’s folded in half to carry it in the Tiwal bag, but if you wish to do so it can also be transported full-size in a standard windsurfing bag: the bag is supplied with it. There you go, it’s folded. So we’re going to put it together, battens and the boom.
Rig the Sail
Now I’m going to unroll my sail. About the sails, we have different models. This one is 75 sq ft. There is a 56 sq ft sail, And a 75 sq ft one, which can be reefed so it offers both sizes. This is the 75 sq ft mainsail. What is interesting is to note that, the main fold in the sail, is down the central part here. Why? Because we have two fabrics on the sail: the Dacron in front and the lighter monofilm. So using the seam as a mark, so that we don’t damage the monofilm. Here we can also see the mainsheet, the vang, the cunningham, the various lines are all in place. To save time.
We still have to fit the battens and the boom that’s here. For the battens, I’ll start with the top one. There are three identical battens. So no confusion possible. I’m slipping it into the batten pocket, I’m going through the batten tip here, back in the loop, and close it again. The idea is to tension enough to remove any creases. There you go! Same thing for the others. I just have to fit the boom. You can see that it’s a polyester tube. The big advantage is that it is not a traditional aluminum boom that’s going to be scary, and can hit you hard. Now we have something very light, small diameter…. and therefore very reassuring. We’ll position it here, in its pocket. It works like a batten. I’m slipping it in here.
Then position the front end, which is like a rowlock. Which connects to the mast. The rowlock is here. Same, in the pocket And there, in the middle of the sail I have a little window that will allow me to fit the 2 sections together. That way, with the sleeve. There, I close the flap. And I just have to do it up… The velcro. And here my sail is prepared.
Assembling the mast
I’ll go get the mast pieces and assemble them. It is a windsurfing mast. It’s a carbon mast. It is composed of 5 sections. Intentionally I’m putting it on the sail to avoid getting sand in the joints. And I will be able to assemble my mast, piece by piece. I’m passing through here, in the rowlock, and I insert it into slot in the sail. The sections are assembled one by one. This is the third piece… the 4th and the last one. I’m making sure I’m at the end of the pocket. My mast is in place.
Now I’m going to pick up the rig and position it on the boat. A word of caution: be careful not to get sand in the mast foot. As we’re going to fit it in there. So I’ll show you a little something: I use the sail bag which will allow the mast foot to rest without having any problems with the sand. After that, there’s a little trick too, position yourself well with the wind behind you, and put one arm high enough. When I go up, I need to have sufficient leverage so I won’t get blown over. All right? And when I lift it up, I’m going to try to keep it into the wind, to help me, and make it easier and lighter. So here I put my lever arm furthest forward. I lift it up, I rotate…. and I push the rig, the mast into the wind. I can put it here on the bag… to rest a moment. And now, we’re going to position it. Still keeping the wind behind you, I lift… and I slip the mast onto the mast foot. I let it fit together And that’s is it.
Let’s see what’s left in the bag. So there’s the daggerboard and the rudder, That’s the daggerboard. I’ll put it on the boat. And the rudder is there. It’s marine plywood painted black. The advantage of wood is that in the event of hitting the beach, if you hit rocks or a scrape, there’s just a repaint required. No risk of water getting into the rudder blade. So it’s really practical.
Now, I’m going to assemble my tiller. Again with the push-pin system. And now we have the pivoting mechanism. Which works like this. There’s a catch here. It locks in the down position like that… Under way… and to lift it, there’s a tag to pull there… So we’re going to put it in the raised position so it locks in. Now, I’m setting it up on the pintle. And there’s a pin there to avoid losing it. We’ll put it there. Now, all that remains is to install the different lines that are on the sail. The wind has shifted a little bit…. so I’m going to turn the boat back upwind, And then we’ll be able to fix the cunningham. It goes through there… We come back here, tension it, and I put a couple hitches just to secure it. Now we have the vang. It comes through here at the foot of the mast. And we come back here in the camcleat, in the block… With the jammer at the back. That’s it, we end with a figure of 8.
Here we have the mainsheet. I’m going to uncoil it here, put it in the bottom of the boat. I also have the bridle: I keep it like this here, when we’re on standby. It keeps it from hanging from the back of the boat. The bridle acts as a mainsheet traveler. So to fix it, I’m going through the loop. You see, it’s a quick attachment, easy to make. just before you get on the water. Same on the other side. That’s it! Now there’s just the sheet. to pass through the block, here. It’s a winch block. Meaning, it is braked. There is a direction of rotation, there is a ratchet. There’s an arrow here whose direction of rotation must be respected. It will avoid pulling too much on your hands when sailing. At the end, I’m going to tie my figure of 8 knot and that’s it: our boat is ready to sail.
Get ready to sail
Now, I’m going to show you two points about how it works. Especially for the daggerboard, we can’t set it up on the beach, but later on in the water, it will be positioned here, the longer edge to the back, and in front, the bungee cord. The bungee will keep the board in the lowered or raised position, depending on the sailing you’re doing, whether upwind or downwind. Here we have the rudder. I showed you the pivot mechanism earlier: we lift here, it clicks into place…. and we push it to secure it.
When we go sailing, we’re going have one control here, Which is the sheet… That will allow you to fill the sail and spill wind from it. And the second control: the tiller, will allow you to steer the boat. When you are ready, you can simply lift the boat from the front, and drag it the few feet that separate us from the water.
So there, quite easily, we’re on the sand, it’s safe. I can take it to the water. And that’s it. You put on your swimsuit, and off you go!
Follow Us!


Promoted post
Tiwal 3R Max: the high-performance sailboat that travels with you
Discover the new Tiwal 3R Max, a Tiwal 3R supercharged with headsails!